Step 0 - The Idea
Wedding anniversaries can be risky business. After my wedding, I set up a recurring reminder a day before the anniversary. That year I quickly realized that a few hours is a dangerously short scramble to get a meaningful gift, let alone make one. It was a narrow miss, not an angry Mrs (whew!).Luckily, I am a quick learner with strong survival instincts. I changed the reminder to be one month in advance and that has served me well so far. This year marks our fifth ('wood') anniversary. I wanted to do a special project, something that I'd never done before. I decided to make my wife a hand-carved wood pendant, inlaid with semi precious stones.
As you shall see, the first pendant turned out to be more of a narrower teardrop shape due to a mistake early on. The second one became the pendant I had planned on.
This is the process I went through.
Step 1: Procuring the wood
I went to Home Depot's lumber section and talked to the guy working the power saw. I told him I wanted some scrap hard wood, about 3" x 3" x 0.5". He found me a block of wood and cut me two pieces. The rings are very hard but the wood between the rings is relatively softer. I decided to use this to my advantage and simplify my carving effort =) |
| The 3" x 3" x 0.5" block of wood |
Step 2: Procuring the tools
I got the following tools from Home Depot: |
| Husky(TM) 10 file set |
 |
| Minwax(TM) Polycrylic Gloss spray can |
 |
| Ryobi(TM) 7 piece black oxide drill bit set |
 |
| Sandpaper (60, 100, 220, 320, 600 grit) |
Step 3A - Carving the practice pendant
I drew a rough shape on the first piece of wood and using a knife and a hammer, cut out the shape. Here's what it looked like before the cutting went wrong:
Half an hour of filing, re-shaping, and carving out the grooves later, this is what it looked like:

A side profile of the grooves:

Using the Victorinox Swiss army tool's file, I made the grooves deeper:

Then, I worked through the different sandpapers (60, 100, 220 and then 320 grit) to get a smoother, rounder, shinier shape.


Step 3B - Staining the practice pendant
I used a Minwax wood stain pen for this.
Step 3C - Applying the polycrylic finishing layers (3 coats)
I made a contraption using a hanger with a clamp, a chopstick and a piece of thread to suspend the pendant while spraying it with the polycrylic. This was to ensure an even coat from all sides at one time, cutting my time by half, and preventing any droplets of polycrylic on the sides.
After 3 coats, with the recommended time between the coats, here's what it looked like:


All ready for the stone inlay!
Step 4A - Carving the yin-yang pendant
I used the knife + hammer to cut out the drawn shape from the piece of wood. The idea was to get the grooves in a nice and symmetric and then inlay the stones in a yin-yang pattern.
Tip: Make sure to drill the hole for the chain before investing too much time in the carving.

Using the knife, I carved the rough grooves:

Using the smaller files, I started to deepen and shape the grooves around the wood's rings.

Using a larger file, I thinned out the pendant - 1/2" was too thick.

Using the coarse 60 grit sandpaper, I shaped the pendant further, rounding the edges.


Using 100 grit sandpaper rolled up in a small cylinder, I smoothed out the grooves.

Make sure to sand with the grain:

Here's the side view of the grooves and the final thickness of the pendant.

Step 4B: Curing the wood with oil
For the yin-yang pendant, I decided to cure the wood using mineral oil, rather than the stain. The stain had turned out to be darker than I had thought, and I liked the fact that the oil would bring out the natural color and the grain of the wood. It did that nicely. This is after 1 coat (front and back)

And after the second coat (with 24 hours between) and sanding with 320 grit:


Step 4C: Sealing the wood with polycrylic
After 3 coats applied using the same contraption as above, this is what it looked like:

All ready for the stone inlay!
Step 5A: Procuring the stone for the inlay
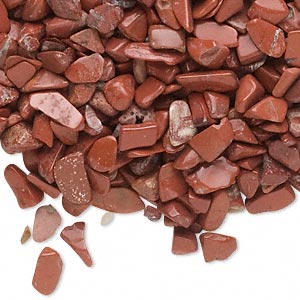
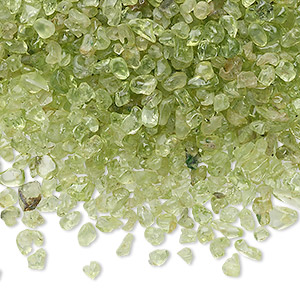
I bought stone inlay chips from Fire Mountain Gems and Beads > Mini chips for inlay and got some Rose Quartz, Jasper, Peridot and Lapis Lazuli: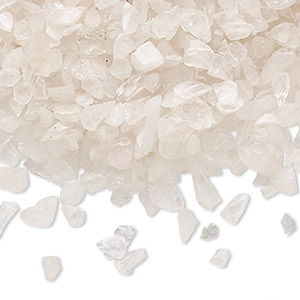

Step 5B: Procuring the super glue.
All instructional videos and blogs stressed that the CA glue should have a very low viscosity, dry clear and must be sandable. After much research (and a particularly helpful comment on the website), I chose Loctite Professional Liquid super glue.
Step 5C: Safety:
Polycrylic and superglue (cyanoacrylate) are both toxic. Also, the dust from sanding may cause respiratory problems. Make sure to read the instructions on the products before using. The fumes can cause irritation of the eye, so use protective eyewear. I worked in a well ventilated room and used a nose mask:
Step 5D: Crushing the stone chips:
I crushed the stone chips in my marble mortar and pestle:

Step 6A: Stone Inlay, first pendant, first pass.
First, I added the crushed lapis lazuli to the bottom groove and saturated it with superglue.
And then, the peridot:

Then, the jasper:

And finally, the rose quartz:

Step 6B: The first pass sanding
After waiting 24 hours for the glue to set, I sanded the stones down using 60 grit till they were flush with the pendant. It took an hour or so. Note to self - use smaller chips to begin with, larger chips don't look as good.
Notice the holes and cracks. Time for the second pass.
Step 6C: Second pass inlay, with smaller chips and powder
After crushing the chips further and passing them through a sieve to collect the smaller chips and powder, I added each kind of stone and saturated it with superglue.
Step 6D: Sand it down after letting the glue cure for 24 hours.

Much better. This was with 60 grit sandpaper and a bit of water. Next, I polished the rock with 100, 220, 320 and finally 600 grit sandpaper. That brought out the stones' natural sparkle.

Step 6E: Finishing up
Finally, I applied 3 more coats of polycrylic to get the finished pendant (Note the asymmetrical shape - during sanding down the stone, I was so busy concentrating on polishing each of the stone stripes, I failed to notice the pendant become slightly asymmetric. I was careful not to repeat the same mistake on the yin-yang pendant)

Step 7A: Second pendant, stone inlay, first pass
For this pendant, I wanted to go with a yin-yang pattern. Using a pencil, I marked the shape through the grooves. I also mixed the rose quartz and jasper (pink and red) to create the yin fill and the peridot and lapis lazuli (green and blue) to create the yang fill. I used a curved business card to maintain the inlay boundary where yin meets the yang. After the yin fill:
And after the yang fill:

Step 7B: Sanding with 60 grit sandpaper to get a smooth stone surface across the pendant.
After the glue cured for a day, I smoothed down the stone to get a smooth finish.
Step 7C: Second pass stone inlay
The sanding exposed a few holes that I filled in with stone dust and added more superglue. (The superglue seals any small holes in the inlay that are too small to fill with stone).
Step 7D: Second pass sanding
Working up using 60, 100, 220 and 320 grit sandpaper, I polished the surface to a smooth finish. (Note: The smaller sized stone chips do look much better!)
Step 7E: Polishing with 600 grit sandpaper
This step brings out the natural sparkle of the stone. I also retreated the wood with mineral oil to add another layer of rich color and to raise the grain. After 24 hours of letting the wood soak the oil:
Step 7F: Finishing up
The last step is to seal the stone and wood. The finished pendant after 3 coats of polycrylic:

Step 8: Happy 5th, my love! =)


kyaa baat hai! im sure the wife must be more than pleased! :P btw its been 5 years? :-o
ReplyDeleteDont the mineral oil and acrilics bite eachother? Awesome pendant btw.
ReplyDelete